

KLICKFLOOR INSTRUCTIONS
KLICKFLOOR FLOATING FLOOR
Kompact Klick is a “floating” floor. Never glue or fix the panels to the surface below. The flooring can be installed wall-to-wall, however in large areas (greater than 50m2) or where the floor may be exposed to unusually wide temperature ranges (such as where underfloor heating is used, in a conservatory or areas adjacent to a south facing window), then it is advisable to use a 5mm space around the edge, as appropriate. For surfaces larger than 50m², we advise that an expansion joint of 5mm is created around the perimeter of the room. In addition, should a single wall or run be longer than 10 linear metres, then a 5mm expansion joint should be allowed around the perimeter. If you are uncertain of the requirements, please contact your retailer who can confirm the exact requirements.
JOINING YOUR KLICKFLOOR
Kompact Klick system panels can be joined in two different ways; either tongue-in-groove or groove-in-tongue. The simplest procedure, however, is groove-in-tongue. The advantage of Kompact Klick is that it allows you to choose your own starting position.
Moreover, you may work either from left to right or from right to left, whichever is best for you. Depending on the direction in which you work, you are advised to begin from either a corner or a door. It is advisable to begin with the groove side of the plank towards the wall and work from left to right.

Figure 1
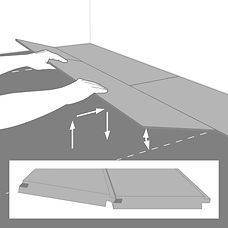
Figure 4

Figure 2

Figure 5

Figure 3

Figure 6
STEP BY STEP INSTRUCTIONS
1. Measure the room carefully to determine the central axis, from which the first row to be laid is outlined.
2.. Check whether the first row of panels needs to be narrowed. If not, the lower groove lip of the first row of panels needs to be removed. Use a utility knife to neatly cut off the lower groove lip.
3. Begin by laying the first row in the corner of the room on your left hand side as you are looking at the wall. Always work from left to right and with the tongue towards yourself (Fig 1).
4. Lay the first row in a straight line and click the head ends together. Put the short side of the profile into head end of the previous panel and press the panel downwards. It is recommended to use a rubber mallet for connecting the head ends so that the joint fits securely. Continue laying the first row in the same way until you get to the last piece (Fig 2).
5. For the last piece, measure the last plank to ensure a tight fit to the wall. Then cut away the marked piece and fit the end panel in the same way as the previous panels. When cutting the panel with a utility knife, make sure that you cut through the wear layer before breaking the panel (Fig 3).
6. For an attractive and natural appearance, we advise you to use the piece left over from row 1 as the first piece in the next row, as long as the remaining piece is at least 1/3 of the total plank length. Do this for all subsequent rows.
7. Fit the second row as you did for the first: start on the left side and slide the groove of the panel under an angle of about 25° over the tongue of the previous row and click the groove into the tongue by laying down the panel while pushing it firmly against the first row (Fig 4).
8. Then fit the second panel by sliding the groove under at an angle of 25° into the tongue of the previous row. Position the corner of the head end against the previous panel and then drop the short side of the profile into the head end of the previous panel and push downwards.
Use a rubber mallet for connecting the head ends so that the joint fits securely. Repeat until you reach the end of the row.
9. To ensure a firm Kompact Klick installation, it is recommended that the planks are tapped together along the long edge with a tapping block and a rubber mallet. This will ensure that the Kompact Klick mechanism is firmly locked during installation, providing a secure joint and avoiding any movement after the installation has been completed (Fig 5).
10. To fit the last row of panels you will usually need to narrow them. Do this as follows: lay a panel on top of the previous row with the groove towards the wall, lay another panel upside down up to the edge of the wall and mark the panel underneath. Cut the panel to size and fit the last row (Fig 6).
11. Door posts and heating pipes also need to be individually fitted. First cut the panel to the right length. Then place the panel next to the object and draw the correct fitting. Next, cut the panel to size. Doorposts can also be sawn to size if necessary to lay the floor beneath them. For cutting around difficult areas such as door posts, heating pipes and other interior furniture; the use of a Jigsaw with the correct plastic cutting blades is suitable and will avoid unsightly cuts at the perimeter of the room.
